When it comes to online business then Hosting is a matter of fact. NameCheap Web Hosting is the most popular online hosting I have seen ever. NameCheap is a leading Domain Hosting Company online. That gives you extra benefits with low price and best service. Can you imagine It can offer you 20GB of hosting within $15 for one year? Yes! You can only get this offer from NameCheap.
Online Business owners while starting their business always try to bring forward at low cost. Hosting is the most import essential part of an online business. Cause all the data and files hosted the hosting platform including the database. So obviously hosting should be secure and trustworthy.
So, these matter keeps in mind NameCheap is secure, trusted, and dedicated Hosting provide. This company started its business in United State now it leads the whole international arena.
A user should know the initial part while he starts to run a website or blog. Domain & Hosting purchase and website setup in including them. Here in this post, I will show you how to buy hosting from Namecheap.
Check Another One:

Table of Contents
Why Namecheap Hosting Is Best For Newbie
Namecheap is a well-known leading company and offers low prices at the same time. This is the main reason for its popularity. Also, the NameCheap service is very good for its users like me. The company was awarded for its users’ service. If you request them to set up your site or install WordPress in your hosting that is not in their service policy. They also do it for you!
Cheap Rate:
This is one of the main reasons for its big user. There are hundreds of good online hosting providers but Namecheap is a unique one. Its offer is really incredible. They offer you a hosting price starting from 0.99$ per month even sometimes give the first month free for on test with a money-back guarantee. You may be clear now about their craziness. So, for the best cheap price NameCheap Webhosting is the best.
Personal cPanel:
Namecheap offer user to single cPanel per user individually. Even they include extra software to navigate the site and monitor activities. It has strong three-level security fro protect the user’s file from malware or hacking. The cPanel dashboard is user-friendly and easy to use.
Strong Security & Backup System:
Namecheap has a team for the security and backlink issue including the software projection. If someone worries about their security system. I can ensure to blindly trust them. But you need to have manual backup regularly for the last dependency. The security issue is best and fine. Let me explain, they use the email or phone SMS system to log in to their account for security purposes. Even you can enable two-step verification to manage it more securely. They have daily, weekly, and monthly basis backup systems to use.
How To Buy NameCheap Web Hosting
Namecheap has multiple plans of Hosting like Shared Hosting, WordPress Hosting, Dedicated Hosting, Reseller Hosting. All of the plan’s buying processes are the same. Shared hosting is the more popular to the newbie online starter.
So, let’s see the plan of NameCheap hosting and the process to buy a Webhosting following some steps.
Hosting Plan | Hosting Price | Buy Now |
Shared Hosting | $1.88/mo | |
Reseller Hosting | $19.88/mo | |
WordPress Hosting | $2.00/mo | |
VPS Hosting | $9.88/mo | |
Dedicated Hosting | $56.88/mo |
Grab Your Offer Now!
Hope you choose your favorite plan. Now let’s see the buying process immediately. Just follow the process below and purchase your favorite hosting plan.
Step 1: Create An Account
Just create an account by following the regular rules. Input your user name, password, email, and first & last name. Then verify it from your email account. Then click on your favorite hosting plan like below.

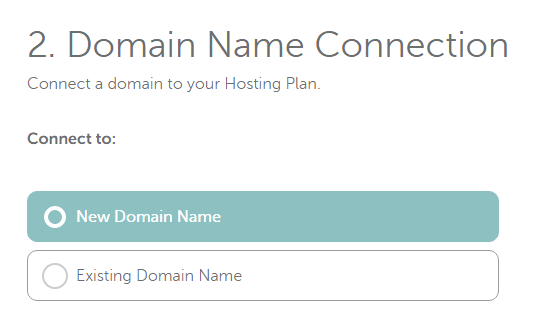
Step 2: Pick Up Your Plan & Domain Name Connection
In this section choose your best plan to use. After that click on the Get Started button that you want to buy. Now connect your domain name which you can select as a primary or main domain to the hosting.
Note: Without Domain Name You Can’t Allow To Buy A Hosting Plan.
If you have the domain name that you already purchased then type the name just to connect it. On the contrary, you just put your new domain name which you want to buy and comment on at the same time. If you add a new one then the price including with the hosting bill.
Step 3: Confirm Order & Get Paid
After connecting the domain name you just click on the Confirm Order including your payment card or option, Then it takes a while and confirms your order.
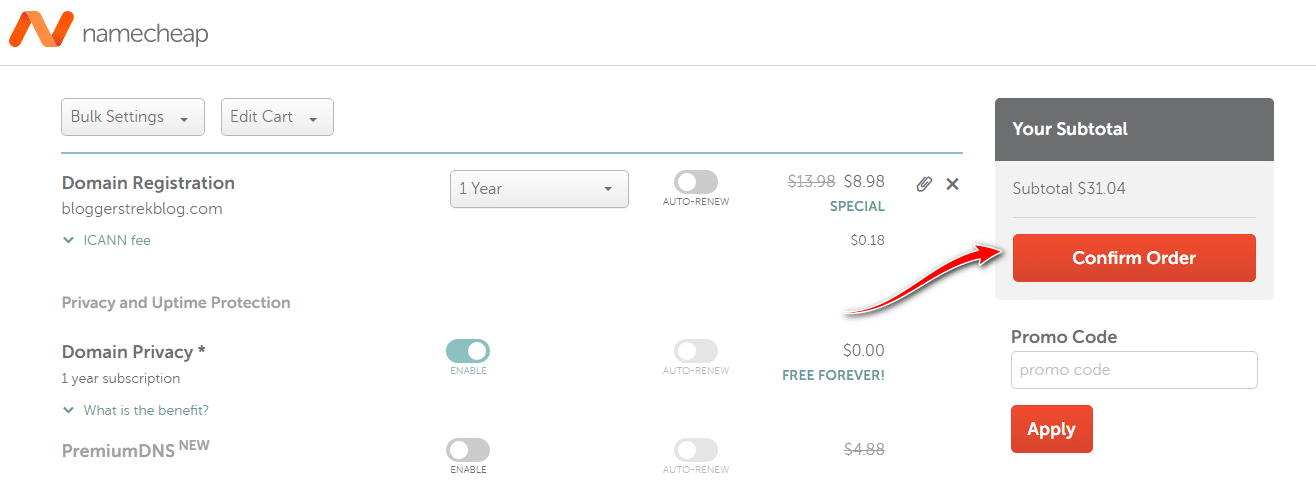
When your order will confirm then you will get an email including your Hosting cPanel Access. Finally, you can buy hosting from NameCheap now.
Now you can set up your others domain name including the add-on domain in cPanel. If you shared hosting plans allow you to add them. So, this is the process and you may clear to purchase and set up the hosting. All of the plans and hosting companies are similar to NameCheap.
If you have any questions about this process then let us know the comment section or know the contact section. I will try to solve your hosting issue on NameCheap.